
After conversion & clean-up
Material assignments
Section titled “Material assignments”Apply RS Materials to objects goes through every Texture tag in the scene. Each one that uses an Octane material the converter just converted is pointed at its Redshift version — same tag, same projection, selection and tiling, only the material swapped. Texture tags using anything else are left alone, so an Octane material that failed to convert stays assigned where it was.
The option needs Materials ticked: untick Materials and it switches off and greys out.
The delete options
Section titled “The delete options”Each Delete… option removes the Octane originals of one pass, once their Redshift replacements exist. They’re off by default — the safe way is to convert, check the render, then delete (or run Nuke Octane).
| Option | Removes |
|---|---|
| Delete Octane Cameras | Each converted camera object. |
| Delete Octane Lights | Each converted light, and each object carrying an Octane Daylight or Environment tag. |
| Delete Octane Materials | Each Octane material that was converted. Unconverted ones stay. |
| Delete Octane Scatter | Each converted Scatter object. |
When you use a Delete option, that pass’s Octane layer is removed too.
Strip all Octane tags removes every Octane Object tag in the scene, and the Octane light tag from lights you keep. It doesn’t remove Octane Camera tags or Daylight and Environment tags — use Nuke Octane for those.
Layers
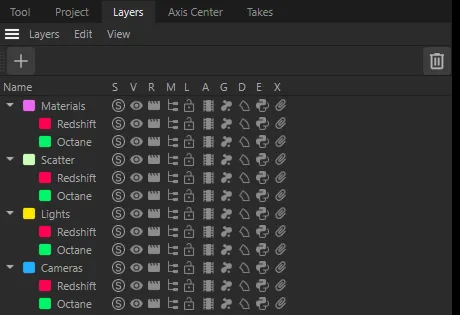
Section titled “Layers”The converter sorts everything into layers, so you can show, hide, solo or select either renderer’s version from the Layer Manager:
- Cameras, Lights, Materials and Scatter — one layer per pass, each with an Octane layer (green) for the originals and a Redshift layer (red) for what was made. The Scatter layer is only made when the scene has an Octane Scatter.
Layers that already exist with those names are reused. Click Open Layers in the Conversion Complete window to go straight there.
Render settings
Section titled “Render settings”After every conversion, the converter switches your active render settings to Redshift: it sets the renderer to Redshift, adds Redshift’s settings to that preset, makes it the active preset and renames it Redshift. Resolution, frame range and output settings are kept, because it’s the same preset. It also sets the project’s node space to Redshift.
This happens whatever you converted. Undo Conversion puts the renderer, the preset’s name and its Redshift settings back as they were; the node space stays Redshift.
The report
Section titled “The report”Everything the converter did — and everything it couldn’t — goes into a report:
- Save Report in the Conversion Complete window saves it wherever you like.
- If the scene has been saved, it’s also written next to the scene file as
<scene name>_conversion_report.txt. - It’s printed to the Console too (Open Console).
Work through Needs review first — materials that only partly converted — then Warnings (every light’s intensity estimate is one) and Errors.
Undoing a conversion
Section titled “Undoing a conversion”Use Undo Conversion in the Conversion Complete window. It:
- removes the Redshift cameras, lights, Matrix objects and materials it made;
- puts back any Octane cameras, lights, scatters and materials it deleted, each in its original place in the Object Manager;
- points every reassigned Texture tag back at its Octane material;
- puts your original objects and materials back on the layers they were on;
- puts the render settings back — see Render settings;
- removes the layers it created.
It’s only offered in that window. Once you’ve closed it, use Edit ▸ Undo (Ctrl+Z / Cmd+Z) instead — a conversion can take several undo steps to step back through. If you might want to go back, save a copy of the scene before converting.
Undo Conversion doesn’t restore:
- the project’s node space;
- Octane tags removed by Strip all Octane tags;
- materials removed by Overwrite in the duplicate-materials check;
- Redshift cameras, lights and Matrix objects removed by Overwrite when converting a second time.